วันจันทร์ที่ 31 มกราคม พ.ศ. 2554

Create Chart with CorePlot (PieChart)

เป็นเรื่องของการทำ Chart นะครับ โดยเราจะใช้ Framework ที่ชื่อ CorePlot ครับ

การใช้ CorePlot ขอเริ่มจาก PieChart ก่อนนะครับ เพราะรู้สึกว่าจะง่ายที่สุดครับ
เริ่มจาก Download CorePlot 
Extract File จะได้ Folder ของ CorePlot (ผมใช้ CorePlot_0.2.2.zip ข้างในจะมีตัวอย่าง Code ให้ด้วยครับ)

สร้าง Project (ผมตั้งชื่อ CorePlotPieChart)
ทำการติดตั้ง Framework (ผมทำแบบที่ง่ายสำหรับผมนะครับ)
เริ่มจาก Copy CorePlot 0.2.2/Source/framework ไว้ใน Folder Project ของเราก่อนครับ


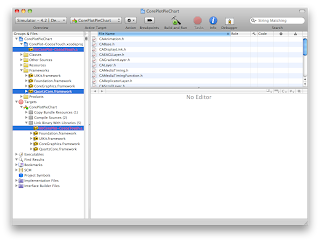
ลาก File CorePlot-CocoaTouch.xcodeproj ใส่ใน Project เปิดใน Project จะมี CorePlot-CocoaTouch.xcodeproj/libCorePlot-CocoaTouch.a อยู่
ลาก FIle libCorePlot-CocoaTouch.a ใส่ไว้ใน Targets/CorePlotPieChart/Link Binary With Libraries
ทำการ Add Framework QuartzCore.framework ใส่ใน Project


ทำการแก้ไข Project Setting
ไปที่ Project -> Edit Project Settings
เริ่มจากกำหนด Header Search Paths (Search คำว่า header se)


Double Click ที่ User Header Search Paths แล้วกดเพิ่ม
ใส่ค่า "${PROJECT_DIR}/framework" ใน Path และเลือก Recursive


ต่อไปทำการกำหนดค่าของ Other Linker Flags (Search คำว่า other link)


เพิ่ม -all_load -ObjC 


เลือก Project -> Edit Active Target "CorePlotPieChart" ที่ Tab General


ที่ Direct Dependencies เพิ่ม CorePlot-CocoaTouch


เสร็จขั้นตอนการ Add Framework
ต่อไปเป็นเรื่องของการใช้งาน
เริ่มจากสร้าง ViewController (ผมสร้าง ViewController ชื่อ PieChartViewController)

เปิด PieChartViewController.h 

#import <UIKit/UIKit.h>
#import "CorePlot-CocoaTouch.h"


@interface PieChartViewController : UIViewController <CPPieChartDataSource> {

IBOutlet CPGraphHostingView *_pieChartView;
CPXYGraph *_pieChart;
NSArray *_data;
}

-(void)constructPieChart;

@end


เปิด PieChartViewController.xib
ลาก View ใส่ใน MainView หลังจากนั้นไปที่ Inspector ที่ Tab identity
ใส่ชื่อ Class CPGraphHostingView ในส่วนของ Class
Link View ที่สร้างกับ Outlet _pieChartView


เปิด PieChartViewController.m
ที่ - (void)viewDidLoad; เพิ่ม [self constructPieChart];


Implement Datasource Protocol

//จำนวนข้อมูลที่จะแสดง
-(NSUInteger)numberOfRecordsForPlot:(CPPlot *)plot{
return [_data count];
}

//ค่าที่จะนำไปใช้ในการสร้าง Chart แต่ละช่อง
-(NSNumber *)numberForPlot:(CPPlot *)plot field:(NSUInteger)fieldEnum recordIndex:(NSUInteger)index{
NSDecimalNumber *num = nil;
if (index >= [_data count]) {
return nil;
}
if (fieldEnum == CPPieChartFieldSliceWidth) {
num = [_data objectAtIndex:index];
}else {
num = (NSDecimalNumber *)[NSDecimalNumber numberWithUnsignedInteger:index];
}
return num;
}

//Label ที่จะแสดงใน Chart
-(CPLayer *)dataLabelForPlot:(CPPlot *)plot recordIndex:(NSUInteger)index
{
CPTextLayer *newLayer = nil;
newLayer = [[[CPTextLayer alloc] initWithText:[NSString stringWithFormat:@"Data %lu", index+1] style:[CPTextStyle textStyle]] autorelease];
newLayer.textStyle.color = [CPColor darkGrayColor];
return newLayer;
}


Implement ส่วนของการสร้าง PieChart (-(void)constructPieChart;)

-(void)constructPieChart{
_pieChart = [[CPXYGraph alloc] initWithFrame:CGRectZero];
//เลือก Theme
CPTheme *theme = [CPTheme themeNamed:kCPDarkGradientTheme];
    [_pieChart applyTheme:theme];
//สร้างพื้นที่สำหรับแสดง Chart
    _pieChartView.hostedGraph = _pieChart;
    _pieChart.plotAreaFrame.masksToBorder = NO;
//ความหนาของกรอบ
    _pieChart.paddingLeft = 20.0;
_pieChart.paddingTop = 20.0;
_pieChart.paddingRight = 20.0;
_pieChart.paddingBottom = 20.0;
_pieChart.axisSet = nil;
//สร้าง Chart (รายละเอียดต่างๆ ของ Chart)
    CPPieChart *piePlot = [[CPPieChart alloc] init];
    piePlot.dataSource = self;
//ขนาด Chart
    piePlot.pieRadius = 120.0;
    piePlot.identifier = @"Pie Chart 1";
piePlot.startAngle = M_PI_4;
piePlot.sliceDirection = CPPieDirectionCounterClockwise;
piePlot.borderLineStyle = [CPLineStyle lineStyle];
//ตำแหน่งของ Label
piePlot.sliceLabelOffset = -35.0;
    [_pieChart addPlot:piePlot];
    [piePlot release];
//ข้อมูลที่จะแสดงใน Chart (อาจจะไปใส่ใน DataSource แทน)
_data = [NSArray arrayWithObjects:[NSNumber numberWithDouble:20.0], [NSNumber numberWithDouble:15.0], [NSNumber numberWithDouble:15.0], [NSNumber numberWithDouble:40.0], [NSNumber numberWithDouble:10.0], nil];
}


เปิด CorePlotPieChartAppDelegate.h

#import <UIKit/UIKit.h>
#import "PieChartViewController.h"

@interface CorePlotPieChartAppDelegate : NSObject <UIApplicationDelegate> {
    UIWindow *window;
PieChartViewController *_pieChartViewController;
}

@property (nonatomic, retain) IBOutlet UIWindow *window;

@end


ใน CorePlotPieChartAppDelegate.m

- (BOOL)application:(UIApplication *)application didFinishLaunchingWithOptions:(NSDictionary *)launchOptions {    
    
    // Override point for customization after application launch.
    
_pieChartViewController = [[PieChartViewController alloc] init];
[window addSubview:_pieChartViewController.view];
    [self.window makeKeyAndVisible];
    
    return YES;
}


Build & Run


วันพฤหัสบดีที่ 27 มกราคม พ.ศ. 2554

การดึงข้อมูลของเครื่อง UIDevice

การดึงรายละเอียดเกี่ยวกับเครื่องที่ใช้งาน ชื่อเครื่อง UDID หรือ OS จะทำงานผ่าน UIDevice 

สร้าง Project ใหม่ (ผมใช้ชื่อ UIDeviceEx)

เปิดไฟล์ UIDeviceExAppDelegate.m 

ที่ Method 
- (BOOL)application:(UIApplication *)application didFinishLaunchingWithOptions:(NSDictionary *)launchOptions

เพิ่ม Code
UIDevice *myDevice = [[UIDevice alloc] init];
NSLog(@"Device Name : %@", myDevice.name);
NSLog(@"Device Model : %@", myDevice.model);
NSLog(@"OS Version : %@", myDevice.systemVersion);
NSLog(@"UDID : %@", myDevice.uniqueIdentifier);
if (myDevice.multitaskingSupported) {
NSLog(@"Multitask : YES");
}else {
NSLog(@"Multitask : NO");
}

วันศุกร์ที่ 14 มกราคม พ.ศ. 2554

XMLParser

สวัสดีครับ
สำหรับ Entry นี้จะเป็นเรื่องของ XML นะครับ
ซึ่งจริงๆ แล้ว XML Parser ก็มีคนทำให้ใช้อยู่หลายตัวนะครับ
และก็มีตัวของ Apple เองด้วย คือ NSXMLParser

การทำงานของ NSXMLParser หลังจากที่สร้าง NSXMLParser กำหนด Delegate แล้ว
เมื่อส่ง Message parse เข้าไปยัง Object ของ NSXMLParser จะเกิด Run loop ขึ้น
เราจะทำการกำหนดการทำงานต่างๆ จาก Event ที่เกิดขึ้น โดยผ่าน Delegate ของ NSXMLParser

เมื่อเริ่มทำการ Parser
– parserDidStartDocument:

เจอ Tag เปิดของ Element
– parser:didStartElement:namespaceURI:qualifiedName:attributes:

เจอ String ใน Element ปัจจุบัน
– parser:foundCharacters:

เจอ Tag ปิดของ Element
– parser:didEndElement:namespaceURI:qualifiedName:

เมื่อเกิด Error
– parser:parseErrorOccurred:

เมื่อทำการ Parser เสร็จสิ้น
– parserDidEndDocument:

และยังมี Delegate สำหรับ Event อื่นๆ ซึ่งดูได้จากใน Document
XML ที่ใช้ทดสอบจะใช้ XML จาก W3C 
ขั้นแรกก็มาดูโครงสร้างของ XML จาก File simple.xml
รูปแบบทั่วไปคือ

<breakfast_menu>
<food>
<name></name>
<price></price>
<description></description>
<calories></calories>
</food>
</breakfast_menu>


เปิด Xcode สร้าง Project ขึ้นมา (ผมใช้ชื่อ XMLParser)

Download File xml ใส่ใว้ใน Project (ไว้ใน Resources)

ไปที่ XMLParserAppDelegate.h (.h)
สร้างตัวแปรสำหรับเก็บค่าต่างๆ ตามรูปแบบทั่วไปของ XML (อาจสร้าง Class สำหรับมาใช้เก็บข้อมูล)
และ NSXMLParser ขึ้นมา

#import <UIKit/UIKit.h>

@interface XMLParserAppDelegate : NSObject <UIApplicationDelegate> {
    UIWindow *window;
NSMutableArray *_breakfast_menu;
NSMutableDictionary *_currentFood;
NSMutableString *_currentElement;
NSMutableString *_currentName;
NSMutableString *_currentPrice;
NSMutableString *_currentDescription;
NSMutableString *_currentCalories;
NSXMLParser *_xmlParser;
}

@property (nonatomic, retain) IBOutlet UIWindow *window;

@end


ไปที่ XMLParserAppDelegate.m (.m)

ใน - (BOOL)application:(UIApplication *)application didFinishLaunchingWithOptions:(NSDictionary *)launchOptions {    

เราจะทำการสร้าง NSXMLParser ขึ้นมา (เมื่อเจอ [_xmlParser parse]; จะเริ่มทำการ Parser)

- (BOOL)application:(UIApplication *)application didFinishLaunchingWithOptions:(NSDictionary *)launchOptions {    
    // Override point for customization after application launch.
_breakfast_menu = [[NSMutableArray alloc] init];
NSURL *xmlURL = [NSURL fileURLWithPath:[[NSBundle mainBundle] pathForResource:@"simple" ofType:@"xml"]];
_xmlParser = [[NSXMLParser alloc] initWithContentsOfURL:xmlURL];
[_xmlParser setDelegate:self];
[_xmlParser parse];
    [window makeKeyAndVisible];
return YES;
}


ทำการ Implement Delegate method สำหรับ Event ต่างๆ

เมื่อเกิด Error ให้แสดง Error
- (void) parser: (NSXMLParser*) parser parseErrorOccurred: (NSError *) parseError{
NSLog(@"XML Parser Error : %@", parseError);
}

เริ่มการ Parser สร้าง Object สำหรับบอก Element ปัจจุบัน
-(void)parserDidStartDocument:(NSXMLParser *)parser{
_currentElement = [[NSMutableString alloc] init];
}

เจอ Tag เปิดกำหนดค่าของ _currentElement เพื่อนำไปตรวจสอบชนิดของ Element ที่ทำงานอยู่
ถ้าเป็น Tag food สร้าง Object สำหรับเก็บรายละเอียด
- (void)parser:(NSXMLParser *)parser didStartElement:(NSString *)elementName namespaceURI:(NSString *)namespaceURI qualifiedName:(NSString *)qName attributes:(NSDictionary *)attributeDict{
[_currentElement setString:elementName];
if([elementName isEqualToString: @"food"]){
_currentFood = [[NSMutableDictionary alloc] init];
_currentName = [[NSMutableString alloc] init];
_currentPrice = [[NSMutableString alloc] init];
_currentDescription = [[NSMutableString alloc] init];
_currentCalories = [[NSMutableString alloc] init];

}
}

เจอ Tag ปิดทำการเก็บค่าที่ได้
- (void)parser:(NSXMLParser *)parser didEndElement:(NSString *)elementName namespaceURI:(NSString *)namespaceURI qualifiedName:(NSString *)qName{
if([elementName isEqualToString: @"food"]){
[_breakfast_menu addObject: _currentFood];
[_currentFood release];

}else if([elementName isEqualToString: @"name"]){
[_currentFood setObject: _currentName forKey: @"name"];
[_currentName release];
}else if([elementName isEqualToString: @"price"]){
[_currentFood setObject: _currentPrice forKey: @"price"];
[_currentPrice release];
}else if([elementName isEqualToString: @"description"]){
[_currentFood setObject: _currentDescription forKey: @"description"];
[_currentDescription release];
}else if([elementName isEqualToString: @"calories"]){
[_currentFood setObject: _currentCalories forKey: @"calories"];
[_currentCalories release];

}
}

เจอข้อมูลระหว่าง Tag
- (void)parser:(NSXMLParser *)parser foundCharacters:(NSString *)string{
if(![[string stringByTrimmingCharactersInSet: [NSCharacterSet whitespaceAndNewlineCharacterSet]] isEqualToString: @""]){
if([_currentElement isEqualToString: @"name"]){
[_currentName appendString: string];
}else if([_currentElement isEqualToString: @"price"]){
[_currentPrice appendString: string];
}else if([_currentElement isEqualToString: @"description"]){
[_currentDescription appendString: string];
}else if([_currentElement isEqualToString: @"calories"]){
[_currentCalories appendString: string];
}
}
}

จบการทำ Parser
- (void)parserDidEndDocument:(NSXMLParser *)parser {
for (NSMutableDictionary *food in _breakfast_menu){
NSLog(@"\n\n");
NSLog(@"Name        : %@", [food objectForKey: @"name"]);
NSLog(@"Price       : %@", [food objectForKey: @"price"]);
NSLog(@"Description : %@", [food objectForKey: @"description"]);
NSLog(@"Calories    : %@", [food objectForKey: @"calories"]);
}
[_currentElement release];
}


ลอง Build & Run ดูผลใน Debugger Console


วันพุธที่ 5 มกราคม พ.ศ. 2554

ทำ CustomCell สำหรับ UITableView

สร้าง Project ใหม่
ผมสร้าง Project ชื่อ TableViewCustomCell

เริ่มจากการสร้าง Class CustomTableViewCell สำหรับออกแบบ Cell ของ Table
เพิ่ม File ใหม่เลือก Add -> New File… ที่ Objective-C class ตรง Subclass of เลือก UITableViewCell


สร้าง XIB File เลือก Add -> New File… ที่ User Interface เลือก Empty XIB ตั้งชื่อเดียวกับชื่อ Class


เปิด CustomTableViewCell.xib
เพิ่ม UITableViewCell แล้วไปที่ Inspector ที่ Class Identify เลือก Class เป็น CustomTableViewCell 


เปิด TableViewCell ที่สร้างขึ้นมา (ใน IB)
ทำการออกแบบหน้าตา Cell แบบที่ต้องการ
ผมใส่ UIView สีน้ำเงิน Slider และ Label เข้าไป จัดตำแหน่ง


ไปที่ CustomTableVIewCell.h เราจะสร้าง Outlet สำหรับเชื่อม User Interface และ Code เข้าด้วยกัน

#import <UIKit/UIKit.h>


@interface CustomTableViewCell : UITableViewCell {
IBOutlet UIView *_colorView;
IBOutlet UILabel *_cellName;
IBOutlet UISlider *_cellSlider;
}

@property (nonatomic, retain) UILabel *cellName;
@property (nonatomic, retain) UIView *colorView;
@property (nonatomic, retain) UISlider *cellSlider;

@end


ไปที่ CustomTableViewCell.m

@synthesize cellName = _cellName;
@synthesize cellSlider = _cellSlider;
@synthesize colorView = _colorView;

- (void)dealloc {
[_cellName release];
[_cellSlider release];
[_colorView release];
    [super dealloc];
}


ไปที IB (Interface Builder)
ทำการ Link Property (CTRL + Drag)


ในส่วนของ interface ไปที่ File TableViewCustomCell.h
import Class ของ TableViewCell ที่เราสร้างไว้ CustomTableViewCell.h
ใส่ Delegate และ DataSource ของ UITableView
เพิ่ม Property UITableView และ NSArray ที่ใช้แสดง Table

#import <UIKit/UIKit.h>
#import "CustomTableViewCell.h"

@interface TableViewCustomCellAppDelegate : NSObject <UITableViewDelegate, UITableViewDataSource, UIApplicationDelegate> {
    UIWindow *window;
UITableView *_tableView;
NSArray *_tableData;
}

@property (nonatomic, retain) IBOutlet UIWindow *window;

@end


ที่ TableViewCellCustomCell.m

- (BOOL)application:(UIApplication *)application didFinishLaunchingWithOptions:(NSDictionary *)launchOptions {    
    // Override point for customization after application launch.
_tableData = [[NSArray alloc] initWithObjects:@"Cell 1", @"Cell 2", @"Cell 3", nil];
_tableView = [[UITableView alloc
  initWithFrame:CGRectMake(0, 0, 300, 500) style:UITableViewStylePlain];
_tableView.dataSource = self;
_tableView.delegate = self;
_tableView.center = window.center;
[window addSubview:_tableView];
    [window makeKeyAndVisible];
return YES;
}


Implement Protocol

สร้าง Cell
-(UITableViewCell *)tableView:(UITableView *)tableView cellForRowAtIndexPath:(NSIndexPath *)indexPath{
CustomTableViewCell *cell = (CustomTableViewCell *)[tableView dequeueReusableCellWithIdentifier:@"tableCell"];
if (cell == nil) {
NSArray *cellArray = [[NSBundle mainBundle] loadNibNamed:@"CustomTableViewCell" owner:self options:nil];
for (int i = 0; i < [cellArray count]; ++i) {
id obj = [cellArray objectAtIndex:i];
if ([obj isKindOfClass:[CustomTableViewCell class]]) {
cell = obj;
cell.cellName.text = [_tableData objectAtIndex:indexPath.row];
}
}
}
return cell;
}

กำหนดความสูงของ Cell
-(CGFloat)tableView:(UITableView *)tableView heightForRowAtIndexPath:(NSIndexPath *)indexPath{
return 100.0f;
}

จำนวน Cell
-(NSInteger)tableView:(UITableView *)table numberOfRowsInSection:(NSInteger)section{
return [_tableData count];
}


ลอง Build & Run ดูครับ
ใน TableViewCell ที่เราสร้างเองสามารถประยุกต์ใช้ได้ครับ
User Interface ที่ใส่เข้าไป เช่น UIView หรือ UISlider ใส่เข้าไปเพื่อให้เห็นลักษณะของ Cell ครับ