วันพุธที่ 5 มกราคม พ.ศ. 2554

ทำ CustomCell สำหรับ UITableView

สร้าง Project ใหม่
ผมสร้าง Project ชื่อ TableViewCustomCell

เริ่มจากการสร้าง Class CustomTableViewCell สำหรับออกแบบ Cell ของ Table
เพิ่ม File ใหม่เลือก Add -> New File… ที่ Objective-C class ตรง Subclass of เลือก UITableViewCell


สร้าง XIB File เลือก Add -> New File… ที่ User Interface เลือก Empty XIB ตั้งชื่อเดียวกับชื่อ Class


เปิด CustomTableViewCell.xib
เพิ่ม UITableViewCell แล้วไปที่ Inspector ที่ Class Identify เลือก Class เป็น CustomTableViewCell 


เปิด TableViewCell ที่สร้างขึ้นมา (ใน IB)
ทำการออกแบบหน้าตา Cell แบบที่ต้องการ
ผมใส่ UIView สีน้ำเงิน Slider และ Label เข้าไป จัดตำแหน่ง


ไปที่ CustomTableVIewCell.h เราจะสร้าง Outlet สำหรับเชื่อม User Interface และ Code เข้าด้วยกัน

#import <UIKit/UIKit.h>


@interface CustomTableViewCell : UITableViewCell {
IBOutlet UIView *_colorView;
IBOutlet UILabel *_cellName;
IBOutlet UISlider *_cellSlider;
}

@property (nonatomic, retain) UILabel *cellName;
@property (nonatomic, retain) UIView *colorView;
@property (nonatomic, retain) UISlider *cellSlider;

@end


ไปที่ CustomTableViewCell.m

@synthesize cellName = _cellName;
@synthesize cellSlider = _cellSlider;
@synthesize colorView = _colorView;

- (void)dealloc {
[_cellName release];
[_cellSlider release];
[_colorView release];
    [super dealloc];
}


ไปที IB (Interface Builder)
ทำการ Link Property (CTRL + Drag)


ในส่วนของ interface ไปที่ File TableViewCustomCell.h
import Class ของ TableViewCell ที่เราสร้างไว้ CustomTableViewCell.h
ใส่ Delegate และ DataSource ของ UITableView
เพิ่ม Property UITableView และ NSArray ที่ใช้แสดง Table

#import <UIKit/UIKit.h>
#import "CustomTableViewCell.h"

@interface TableViewCustomCellAppDelegate : NSObject <UITableViewDelegate, UITableViewDataSource, UIApplicationDelegate> {
    UIWindow *window;
UITableView *_tableView;
NSArray *_tableData;
}

@property (nonatomic, retain) IBOutlet UIWindow *window;

@end


ที่ TableViewCellCustomCell.m

- (BOOL)application:(UIApplication *)application didFinishLaunchingWithOptions:(NSDictionary *)launchOptions {    
    // Override point for customization after application launch.
_tableData = [[NSArray alloc] initWithObjects:@"Cell 1", @"Cell 2", @"Cell 3", nil];
_tableView = [[UITableView alloc] 
  initWithFrame:CGRectMake(0, 0, 300, 500) style:UITableViewStylePlain];
_tableView.dataSource = self;
_tableView.delegate = self;
_tableView.center = window.center;
[window addSubview:_tableView];
    [window makeKeyAndVisible];
return YES;
}


Implement Protocol

สร้าง Cell
-(UITableViewCell *)tableView:(UITableView *)tableView cellForRowAtIndexPath:(NSIndexPath *)indexPath{
CustomTableViewCell *cell = (CustomTableViewCell *)[tableView dequeueReusableCellWithIdentifier:@"tableCell"];
if (cell == nil) {
NSArray *cellArray = [[NSBundle mainBundle] loadNibNamed:@"CustomTableViewCell" owner:self options:nil];
for (int i = 0; i < [cellArray count]; ++i) {
id obj = [cellArray objectAtIndex:i];
if ([obj isKindOfClass:[CustomTableViewCell class]]) {
cell = obj;
cell.cellName.text = [_tableData objectAtIndex:indexPath.row];
}
}
}
return cell;
}

กำหนดความสูงของ Cell
-(CGFloat)tableView:(UITableView *)tableView heightForRowAtIndexPath:(NSIndexPath *)indexPath{
return 100.0f;
}

จำนวน Cell
-(NSInteger)tableView:(UITableView *)table numberOfRowsInSection:(NSInteger)section{
return [_tableData count];
}


ลอง Build & Run ดูครับ
ใน TableViewCell ที่เราสร้างเองสามารถประยุกต์ใช้ได้ครับ
User Interface ที่ใส่เข้าไป เช่น UIView หรือ UISlider ใส่เข้าไปเพื่อให้เห็นลักษณะของ Cell ครับ


วันพฤหัสบดีที่ 23 ธันวาคม พ.ศ. 2553

UITableView (Basic) Part2

จาก Entry ที่แล้วเราสามารถจะสร้าง TableView ขึ้นมาใช้งานได้
โดยที่เราทำได้คือ การสร้าง Table แสดงข้อมูล การเลือก Row ใน Table
Entry นี้ก็จะมาต่อกันที่การลบนะครับ

เริ่มจากการเปลี่ยนชนิดของตัวแปรที่ใช้เก็บข้อมูลของ Table (_tableData) ก่อนครับ
จาก NSArray เป็น NSMutableArray เพื่อให้เปลี่ยนแปลงแก้ไขข้อมูลได้ครับ  

ส่วนของ interface (.h)
NSMutableArray *_tableData;


ส่วนของ implementation (.m)
_tableData = [[NSMutableArray alloc] initWithObjects:@"Data1", @"Data2", @"Data3", nil];


เพิ่ม Method

-(void)tableView:(UITableView *)tableView commitEditingStyle:(UITableViewCellEditingStyle)editingStyle forRowAtIndexPath:(NSIndexPath *)indexPath{
if (editingStyle == UITableViewCellEditingStyleDelete) {
[_tableData removeObjectAtIndex:indexPath.row];
[tableView deleteRowsAtIndexPaths:[NSArray arrayWithObject:indexPath] withRowAnimation:YES];
}
}


เราก็จะสามารถลบ Row ใน Table ได้แล้วครับ

ต่อไปก็จะเป็นการทำ Table ที่มีหลายๆ Section นะครับ
เริ่มจากเพิ่ม Property ใน interface

NSArray *_sectionName;


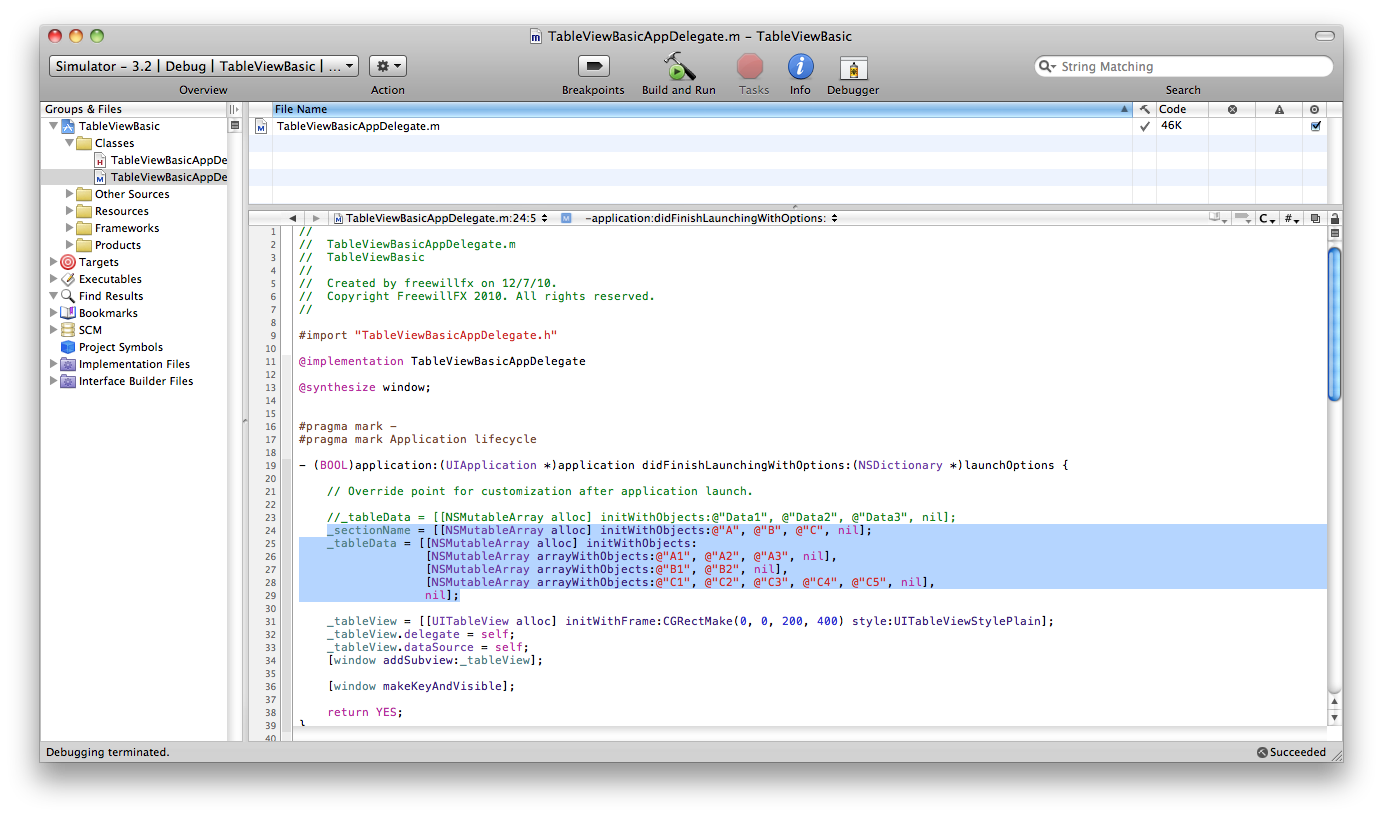
สร้าง Array ใน implementation  (ทำง่ายๆ นะครับ เอาไปประยุกต์ใช้)

_sectionName = [[NSMutableArray alloc] initWithObjects:@"A", @"B", @"C", nil];
_tableData = [[NSMutableArray alloc] initWithObjects:
  [NSMutableArray arrayWithObjects:@"A1", @"A2", @"A3", nil], 
  [NSMutableArray arrayWithObjects:@"B1", @"B2", nil],
  [NSMutableArray arrayWithObjects:@"C1", @"C2", @"C3", @"C4", @"C5", nil], 


ปรับ Code ส่วนของ UITableViewDelegate และ UITableViewDataSource 

-(void)tableView:(UITableView *)tableView didSelectRowAtIndexPath:(NSIndexPath *)indexPath{
NSLog(@"%@", [[_tableData objectAtIndex:indexPath.section] objectAtIndex:indexPath.row]);
}

-(UITableViewCell *)tableView:(UITableView *)tableView cellForRowAtIndexPath:(NSIndexPath *)indexPath{
UITableViewCell *cell = [tableView dequeueReusableCellWithIdentifier:@"tableCell"];
if (cell == nil) {
cell = [[[UITableViewCell alloc] initWithStyle:UITableViewCellStyleDefault reuseIdentifier:@"tableCell"] autorelease];
}
cell.textLabel.text = [[_tableData objectAtIndex:indexPath.section] objectAtIndex:indexPath.row];
return cell;
}

-(NSInteger)tableView:(UITableView *)table numberOfRowsInSection:(NSInteger)section{
return [[_tableData objectAtIndex:section] count];
}

เพิ่ม Method -(NSInteger)numberOfSectionsInTableView:(UITableView *)tableView

-(NSInteger)numberOfSectionsInTableView:(UITableView *)tableView{
return [_tableData count];
}

เพิ่ม Method -(NSString *)tableView:(UITableView *)tableView titleForHeaderInSection:(NSInteger)section

-(NSString *)tableView:(UITableView *)tableView titleForHeaderInSection:(NSInteger)section{
return [_sectionName objectAtIndex:section];
}

-(void)tableView:(UITableView *)tableView commitEditingStyle:(UITableViewCellEditingStyle)editingStyle forRowAtIndexPath:(NSIndexPath *)indexPath{
if (editingStyle == UITableViewCellEditingStyleDelete) {
[[_tableData objectAtIndex:indexPath.section] removeObjectAtIndex:indexPath.row];
[tableView deleteRowsAtIndexPaths:[NSArray arrayWithObject:indexPath] withRowAnimation:YES];
}
}


*ย้าย Position ของ UITableView ไว้กลางจอ เพื่อให้เห็นชัด
_tableView.center = window.center;

ลองเอาไปประยุกต์ใช้นะครับ

วันพฤหัสบดีที่ 9 ธันวาคม พ.ศ. 2553

UITableView (Basic)

จะเป็นการสร้าง UITableView แบบง่ายๆ ครับ
เริ่มจากสร้าง Project 
ตั้งชื่อ ผมใช้ชื่อ TableViewBasic


เลือก File TableViewBasicAppDelegate.h
เพิ่ม Protocol และ Property

Protocol
UITableViewDelegate, UITableViewDataSource

Property
UITableView *_tableView;
NSArray *_tableData;


เลือก TableViewBasicAppDelegate.m
ใน Method
- (BOOL)application:(UIApplication *)application didFinishLaunchingWithOptions:(NSDictionary *)launchOptions {    

สร้าง UITableView
_tableView = [[UITableView alloc] initWithFrame:CGRectMake(0, 0, 200, 400) style:UITableViewStylePlain];
_tableView.delegate = self;
_tableView.dataSource = self;
[window addSubview:_tableView];


สร้าง TableData ที่ต้องการแสดงใน TableView 

_tableData = [[NSArray alloc] initWithObjects:@"Data1", @"Data2", @"Data3", nil];


Implement UITableView Protocol สำคัญ 2 ตัว (เป็นส่วนของ UITableViewDataSource)

เป็น Method สำหรับสร้าง Cell
-(UITableViewCell *)tableView:(UITableView *)tableView cellForRowAtIndexPath:(NSIndexPath *)indexPath{
UITableViewCell *cell = [tableView dequeueReusableCellWithIdentifier:@"tableCell"];
if (cell == nil) {
cell = [[[UITableViewCell alloc] initWithStyle:UITableViewCellStyleDefault reuseIdentifier:@"tableCell"] autorelease];
}
cell.textLabel.text = [_tableData objectAtIndex:indexPath.row];
return cell;
}
* NSIndexPath จะเก็บ Row และ Section ของ TableView

เป็น Method สำหรับบอกจำนวน Cell
-(NSInteger)tableView:(UITableView *)table numberOfRowsInSection:(NSInteger)section{
return [_tableData count];
}


ลอง Build And Run จะมี TableView แสดงข้อมูลใน _tableData ที่สร้างไว้

เวลา Cell ถูกเลือกจะทำงานกับ UITableViewDelegate 

-(void)tableView:(UITableView *)tableView didSelectRowAtIndexPath:(NSIndexPath *)indexPath{
NSLog(@"%@", [_tableData objectAtIndex:indexPath.row]);
}


เมื่อเราเลือก Cell ใน Log จะแสดงข้อมูลใน _tableData 


วันศุกร์ที่ 26 พฤศจิกายน พ.ศ. 2553

CoreData Multiple Entity Relationship

สำหรับ Entry นี้จะเป็นเรื่องของการสร้าง Entity มากกว่า 1 ตัวนะครับ
ใน Entry นี้จะไม่ทำเรื่องของ UI นะครับ
จะแสดงแค่วิธีการ เอาไปประยุกต์เองนะครับ

เริ่มจากการเพิ่ม Entity ใน File CoreDataFromTemplate.xcdatamodel
(File .xcdatamodel ที่เราออกแบบตัวเก็ยข้อมูล ดูได้ใน Entry เก่าครับ)
ผมจะเพิ่ม Entity เข้าไป 2 ตัวนะครับ เป็น A กับ B
และทั้ง A และ B จะมี Property name นะครับ


เราจะทำ Relation ระหว่าง A และ B นะครับ
รูปแบบก็เป็น A has_many B ละกันครับ

เริ่มจากเพิ่ม Relationship ใน A และ B ครับ
เลือก Entity A แล้วไปที่ส่วนของ Property กดที่เครื่องหมาย + เลือก Add Relationship
ผมตั้งชื่อว่า bList นะครับ Destination เลือก Entity B เลือกช่อง To-Many Relationship


หลังจากนั้นเลือก Entity B ครับ
เพิ่ม Relationship ใน Property ครับ
ผมตั้งชื่อว่า a นะครับ Destination เลือก Entity A และ Inverse เลือก bList ครับ


Save ครับ

สร้าง File ใหม่ครับ เลือก Add -> New File… เลือก Managed Object Class


ที่หน้าของ Managed Object Class Generation เลือก Entity A และ B กด Finish


จะได้ File เพิ่มมา 4 File 


เริ่มจากเข้าไปที่ MainViewController.h ทำการ Import File ที่เพิ่มขึ้นมา

#import "A.h"
#import "B.h"


ใน MainViewController.m ที่ Method viewDidLoad
ทำการสร้าง A โดยให้ชื่อ A1

A *a = (A *)[NSEntityDescription insertNewObjectForEntityForName:@"A" inManagedObjectContext:managedObjectContext];
a.name = @"A1";
NSError *error;
if (![managedObjectContext save:&error]) {
}


สร้าง Entity B โดยใส่ Entity B เข้าไปใน A ที่สร้างขึ้น
จะมี Method addBListObject: ซึ่งเป้น Method ที่ถูก Generate สามารถดูได้ใน A.h ครับ

B *b = (B *)[NSEntityDescription insertNewObjectForEntityForName:@"B" inManagedObjectContext:managedObjectContext];
b.name = @"B1";
[a addBListObject:b]; // <<<<<
if (![managedObjectContext save:&error]) {
}
b = (B *)[NSEntityDescription insertNewObjectForEntityForName:@"B" inManagedObjectContext:managedObjectContext];
b.name = @"B2";
[a addBListObject:b]; // <<<<<
if (![managedObjectContext save:&error]) {
}


ผมสร้าง B ขึ้นมา 2 ตัวนะครับ B1 และ B2 ใส่เข้าไปใน Object A

การแสดงผล เริ่มจากการเรียกข้อมูล A ก่อน

NSFetchRequest *request = [[NSFetchRequest alloc] init];
NSEntityDescription *entity = [NSEntityDescription entityForName:@"A" inManagedObjectContext:managedObjectContext];
[request setEntity:entity];
NSMutableArray *aArray = [[managedObjectContext executeFetchRequest:request error:&error] mutableCopy];
if (aArray == nil) {
}
[request release];
[aArray release];


หลังจากนั้นในแต่ละ Entity A จะมี B อยู่ทำการเรียกข้อมูล B จาก A

NSFetchRequest *request = [[NSFetchRequest alloc] init];
NSEntityDescription *entity = [NSEntityDescription entityForName:@"A" inManagedObjectContext:managedObjectContext];
[request setEntity:entity];
NSMutableArray *aArray = [[managedObjectContext executeFetchRequest:request error:&error] mutableCopy];
if (aArray == nil) {
}
[request release];
// ********************* Begin *************************
NSManagedObject *selectObject;
NSPredicate *predicate;
for (A *a in aArray) {
NSLog(@"*** A %@ ***\n", a.name);
selectObject = a;
predicate = [NSPredicate predicateWithFormat:@"a == %@", selectObject];
request = [[NSFetchRequest alloc] init];
entity = [NSEntityDescription entityForName:@"B" inManagedObjectContext:managedObjectContext];
[request setEntity:entity];
[request setPredicate:predicate];
NSMutableArray *bArray = [[managedObjectContext executeFetchRequest:request error:&error] mutableCopy];
if (bArray == nil) {
}
for (B *b in bArray) {
NSLog(@"B %@", b.name);
}
[request release];
[bArray release];
}
// *********************** End **************************
[aArray release];


จะแสดงข้อมูล A และ B ที่อยู่ใน A ออกมาครับ
การลบนะครับ จะมี Method removeBListObject อยู่ครับ
(ผมแทรกหลัง For ของการแสดง B ครับ)

// ********************* Begin ***********************
selectObject = [aArray objectAtIndex:0];
predicate = [NSPredicate predicateWithFormat:@"a == %@", selectObject];
request = [[NSFetchRequest alloc] init];
entity = [NSEntityDescription entityForName:@"B" inManagedObjectContext:managedObjectContext];
[request setEntity:entity];
[request setPredicate:predicate];
NSMutableArray *bArray = [[managedObjectContext executeFetchRequest:request error:&error] mutableCopy];
if (bArray == nil) {
}
[(A *)selectObject removeBListObject:[bArray objectAtIndex:0]];
[request release];
[bArray release];
// ********************** End ***********************


ถ้าใส่ Code การแสดงผลอีกที B1 จะหายไปครับ
(รูปสุดท้ายเป็น Code ทั้งหมดที่เพิ่มใน viewDidLoad โดยยังไม่มีการแสดงผลรอบ 2 นะครับ)